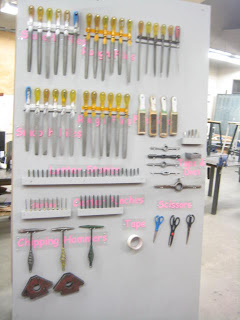
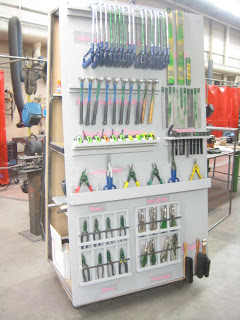
In order to determine what your tool board will look like you must first ask yourself:
Should I hide or display my tools?
Will the tool board be stationary or mobile?
how large should it be?
where would be the best location?
why do i need this tool board? will my needs change?
There are arguments to support any design, hiding tools keeps them safer. displaying tools lets you do quick inventory. Mobile tool board allows you to take your tools with you, ect. When it comes to your tools you will ultimately have right answer for your personal needs. Further more, there is nothing preventing you from making a hybrid model based on your specific needs.
I have often made tool boards that are locked away in a tool room and every time you need a tool you walk from your work bench to the tool room and back. the problem for me was that I spent more time walking back and forth then i did working on my various projects.
my solution to this was to create an "A frame" tool board that was on wheels and that could come with me to my project.
Construction materials for this tool board includes 70 feet of 3/4" square tube for the frame and 2 sheets of 1/2" MDF plywood set on a -14 degree angle. The tools are held in place by various jigs made of 3/4" plywood.
This tool board met all of my needs:
- I was able to display my tools and at the end of the day lock the tool board in the tool room
- Saved me the time of having to go back and forth from the tool room
- There was more than enough space for all the tool I needed
Because all the tool holders had been screwed into the tool board I was not able to rearrange the tools on the tool board. After talking to some friends, they had suggested, making the tool holders separately and place hooks on the tool board every 16 inches, then hang each individual tool holder much like a picture.
This will require more work to begin with however it will make your tool board customizable and allow you to rearrange the layout of your tools to suit your needs.
Other things to consider
- USE A PNEUMATIC BRAD NAILER!!! it will save you so much time when putting things together and is much cheaper than using glue and screws.
- Layout where your tools will go
- make the tool board customizable
- think about your long term needs of the tool board.

