Pages

Sunday, November 13, 2011

Tool Boarding

Tool Boards are a great way to organize your tools and have everything visible. Though often over looked, tool boards are the most important part of starting any project big or small.

In order to determine what your tool board will look like you must first ask yourself:

Should I hide or display my tools?
Will the tool board be stationary or mobile?
how large should it be?
where would be the best location?
why do i need this tool board? will my needs change?

There are arguments to support any design, hiding tools keeps them safer. displaying tools lets you do quick inventory. Mobile tool board allows you to take your tools with you, ect. When it comes to your tools you will ultimately have right answer for your personal needs. Further more, there is nothing preventing you from making a hybrid model based on your specific needs.

I have often made tool boards that are locked away in a tool room and every time you need a tool you walk from your work bench to the tool room and back. the problem for me was that I spent more time walking back and forth then i did working on my various projects.

my solution to this was to create an "A frame" tool board that was on wheels and that could come with me to my project.


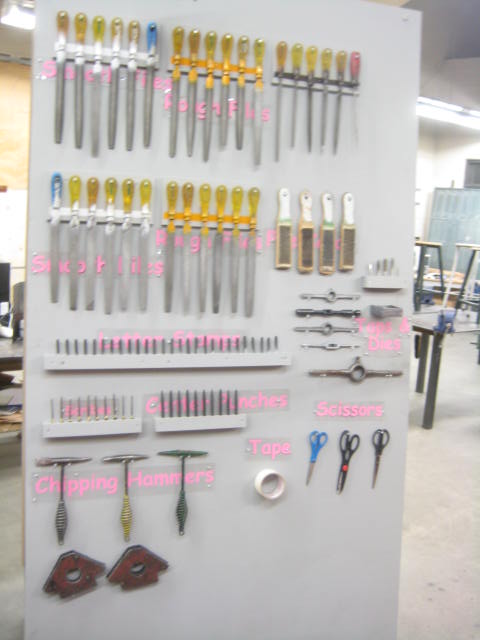
Construction materials for this tool board includes 70 feet of  3/4" square tube for the frame and 2 sheets of 1/2" MDF plywood set on a -14 degree angle. The tools are held in place by various jigs made of 3/4" plywood.

This tool board met all of my needs:
  • I was able to display my tools and at the end of the day lock the tool board in the tool room
  • Saved me the time of having to go back and forth from the tool room
  • There was more than enough space for all the tool I needed
This tool board was an excellent addition to my shop. However as time passed, I found that my needs had changed. There was extra room for new tools as needed, but the placement of tools were not as efficient as i had hoped. for example, hammers and punches should be placed together as well as rulers and scribes.

Because all the tool holders had been screwed into the tool board I was not able to rearrange the tools on the tool board. After talking to some friends, they had suggested, making the tool holders separately and place hooks on the tool board every 16 inches, then hang each individual tool holder much like a picture.

This will require more work to begin with however it will make your tool board customizable and allow you to rearrange the layout of your tools to suit your needs.

Other things to consider
  • USE A PNEUMATIC BRAD NAILER!!!  it will save you so much time when putting things together and is much cheaper than using glue and screws. 
  • Layout where your tools will go
  • make the tool board customizable
  • think about your long term needs of the tool board. 
Good Luck.


Monday, May 23, 2011

The Jewlery Box

This is the 5th jewelry box I have made. Over the years, I have added and changed features to perfect the design. This particular design is made of eastern maple with a black walnut inset as well as dovetail joints on the corners, the inside has an inset tray with blue felt flocking as well an oval mirror. Brass was used for the feet, the hinges, as well as a purchased lock and key.


This model of jewelry box was made for my fiancee at the time who is now my wife (Yes people, my wood craft skills are that good). Above you can see the black walnut inlay.

Above is a picture of the bottom of the jewelry box. The writing was done with a router that was set at 1/8th inch depth then filled with fiberglass. if you look closely, you can see the date 08 /06 / 26 the date I proposed.

One of the benefits of this project is that it becomes as complex and challenging as you want it to be. In its basic form, the box can be built in 10 hours and cost $5 to build. My total time on this project was 45 hours and cost was upwards of $100.

Wednesday, May 18, 2011

BCIT Education

I have received a few E-mails from people asking what education is required to become a Technology Education Teacher in BC.
As far as I know, the BCIT / UBC Partnership is the only accredited educational path available in BC.
(1 year) 18 credits university transferable credits
(2 years) British Columbia Institute of Technology (BCIT) for shop training
(1 year) University of British Columbia (UBC) for Bachelors of Education (B.Ed)

I am the youngest of 3 children in my family. By the time my parents paid for my older siblings education, vehicles, ect, there was no money set aside for me. I managed to save enough money to pay my way through by working and racking up debt on student loans, but the total cost from 2001-2005 was over $35,000

you can expect to pay more than that now as both the cost of living and tuition have gone up in Vancouver. This Shop Certification is valid in Australia, New Zealand, and The United Kingdom; as for Germany, I am not sure.

My time at UBC was a bit of a waste but i learned to perfect my skills while i was at BCIT. I completed many projects while at BCIT, Below is a picture of a CAD / CAM project, I also made a large shaker style kitchen table while there but have since misplaced the pictures.

This is a business card holder with a small picture of Mr. T on it. The image was drawn in AutoCad and converted to G code and cut on a CNC Machine. Stay tuned in September I will be documenting how to build your own CNC Machine.

Friday, May 13, 2011

Bird Cage


The second part of my blog will now focus on Metal Work.

This Bird Cage was the first of many metal projects that began in 2008 when I moved to Kwantlen. The objective of the project was to make a jig system that would allow equal spacing for all the bars as well as make the cage functional.
the cage is constructed of 1" round tube with 1/8" rod for the cage and 1/2" flat bar for extra support. there is a sheet metal try at the bottom to clean out the cage.
The spider web acts as a side door that works on a pin hinge.

After this prototype, 3 more cages were made but with less detail and more standard materials, mainly expanded steel and thinner metal tubing to cut costs.

I made this cage as a side project to keep myself occupied at work. When I first went to Kwantlen, there was not much that could be done. The Shop was built for "Weld and Fab".
In the days that follow, more posts will be dedicated to both Metal Projects as well as Shop Setup and Tool Boarding. As both were done in conjunction from 2008-2011.

Monday, May 2, 2011

Walking Cane


In the winter of 2008, my Grandfather was coming for a visit from England, I decided to make a Walking Cane. Although my family was not impressed with the project, a lot of time and care was placed into this cane. The Cane was made of Black Walnut with a strip of Maple down the center to provide some style. The handle was cast brass, threaded onto the cane.
The Cane is made in two pieces with brass fittings to join them together, you may find that over time the threading and un-threading of the cane will cause the 2 pieces to stop lining up.To solve this problem, add a paper shim.

Tuesday, April 26, 2011

The Rocking Horse


In September of 2007 I stared a 30 hour project to make a Shaker style rocking horse. The Lumber is 2" pine and the plans came from Lee Valley. I made a few minor modifications and added a few personal touches to make the project more meaning full.


This project is heavy on the Band saw and various different sanders.
The cushion is made of Pl-ether and cotton foam.
Additionally, you can use Nylon rope and a staple gun to make the hair of the horse.
This horse was a gift for my nephew.

Back Yard Transformation

In the Summer of 2007, I woke up one morning looked at my back yard and knew I needed to do something. The grass was dead and hard, the garden bed was made of clay. The junipers in the back have been poisoning the grass too.

I started by ripping out the old bed which was made up of 1 x 4's held together by wedges.

Two trenches were dug to cut the roots of the junipers then a new garden bed line was made using 4" x 4" landscape ties two rows high.


Next I bought a truck load of top soil.

After a weekend of shoveling and raking and help from a good friend...

That fall I re-seeded the lawn and moved, so I don't have a finished photo but trust me it looks good.

Floors


In 2007 I tried my hand at home remodeling on the weekend. This is my sisters place, minimal amount of work was done, I used a table saw for all cuts although looking back a chop saw and band saw combo would be a better option.

Baseboards are the originals, they were removed painted and then replaced after comepleation. Some people do not remove the baseboards and instead add a 1/2" trim at the base to hide the gaps left behind. In my opinion, that option looks cheep and your better off to update the base boards or at least save the old ones.

Panorama Ridge Setup


In 2006 I started teaching in Surrey at Panorama Ridge Secondary. The school was brand new and so there was a lot of setup and building required. Adding this to the fact that it was my second year of teaching, it probably was a little to early for me to be setting up a new school. Although, looking back, it was a good experience and if the opportunity comes again, I have some great ideas on how to setup a great school shop.

I will touch more on shop setup later in the 2008-2011


Scroll Saw Art


The images above are images of Jig Saw or Scroll Saw art. This is a simple project that can be done with a complex or simple image.
This image is from the play "Beauty and the Beast"
This project is made of 1/4" Birch Plywood with a 3/4" Black Walnut frame.

Sunday, April 24, 2011

First Post

The purpose of this blog is to document the various aspects of my professional and personal life as it relates to technology.

The Blog will be chronologically ordered starting with the year 2006. Over the 5 year period from 2006-2011 you will see 4 major shifts.

1. Wood Work - Various fine wood projects as well as outdoor carpentry and joinery.

2. Metal Work - Various projects for metal work with the foundation of "advanced fabrication" and "tool building" that will allow for further tool construction. In essence, tools that allow the construction of other tools.

3. The creation of my Art Metal program, this shift revolves around various art metal processes and projects which include stained glass, bead making, enameling, as well as creative metal art.

4. The last shift centers around the construction of educational facilities, tool boards, lockers, welding booths, tables, stools.

From 2011 onward, the blog will shift again this time to focus more on Electronics CAD / CAM application technology and open source technology as well as web technology and micro processor programming.

Stay tuned for more updates!!!!